Uploading Your Tools
JUMP TO A RESOURCE SECTION:
- Choosing Your Upload Method
- Reviewing Your Tools Scan Upload
- Reviewing Your Tool Contours
- Adjusting Your Tool Contours
- Upload Options and Settings
- Upload Settings - Standard Mode
- Upload Settings - Extended Mode
- Different Strategies for Uploading Tools
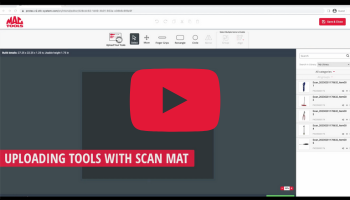 VIDEO TUTORIAL UPLOADING YOUR TOOLS Watch the tutorial video walk through the different methods to upload your own tools to the Mac Tools Foam Editor using your Scan Mat. |
Uploading Tools to the Foam Editor
To upload your Scan Mat photo(s), you must first:
- Log into your MacFoamShop.com account on a computer.
- Choose one of the customizable foam products avaliable.
- Select a foam color, laser engraving settings (optional), and if you would like your Mac Tools distributor to give you a quote for any tools you add from the pre-loaded Mac Tools library.
- Click “CREATE MY FOAM” to advance to the Foam Editor.
- Once in the Foam Editor, click on “Upload Your Tools” icon to activate the tool upload window.
Choose Upload Method
There are TWO methods to upload the photo(s) of your tool(s) on the Scan Mat to the Foam Editor.
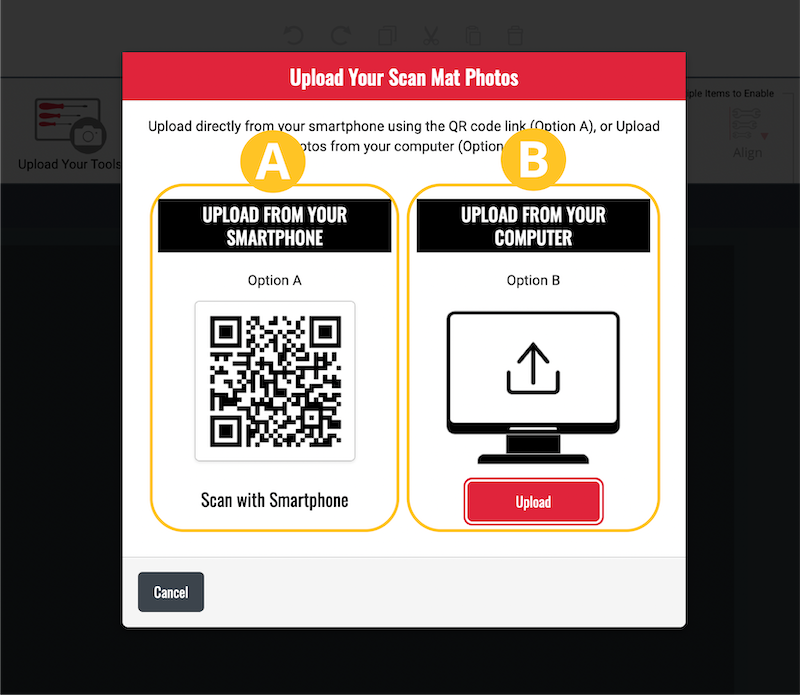
QR Code Method (A)
 Open the camera app on your phone and hold it so your camera sees the QR code on the computer screen. Click the link that pops up on your smartphone.
- Follow the promts on your phone to choose which photo you want to upload to the Foam Editor.
- Confirm your selection and the photo of your tools will automatically upload to the editor.
 Open the camera app on your phone and hold it so your camera sees the QR code on the computer screen. Click the link that pops up on your smartphone.
Desktop Method (B)
Important Note: If transferring scan mat photo(s) to your computer, make sure to transfer the image file(s) at full quality/resolution for best results.
- Click on the "Upload" button under option B. This will open a file selection window on your screen so you can choose the upload photo(s) on your computer.
- Select the correct photo from your computer and click the "Open" to upload to the Foam Editor.
- - - Once you have uploaded your photo you will automatically advance to the Review Page - - -
- - - Repeat the steps to upload additional Scan Mat photos - - -
REVIEWING TOOL SCAN UPLOAD
Remember - Your tool layout on the mat does not need to reflect your desired placement in the foam. You can modify the placement of each tool once the upload is complete.
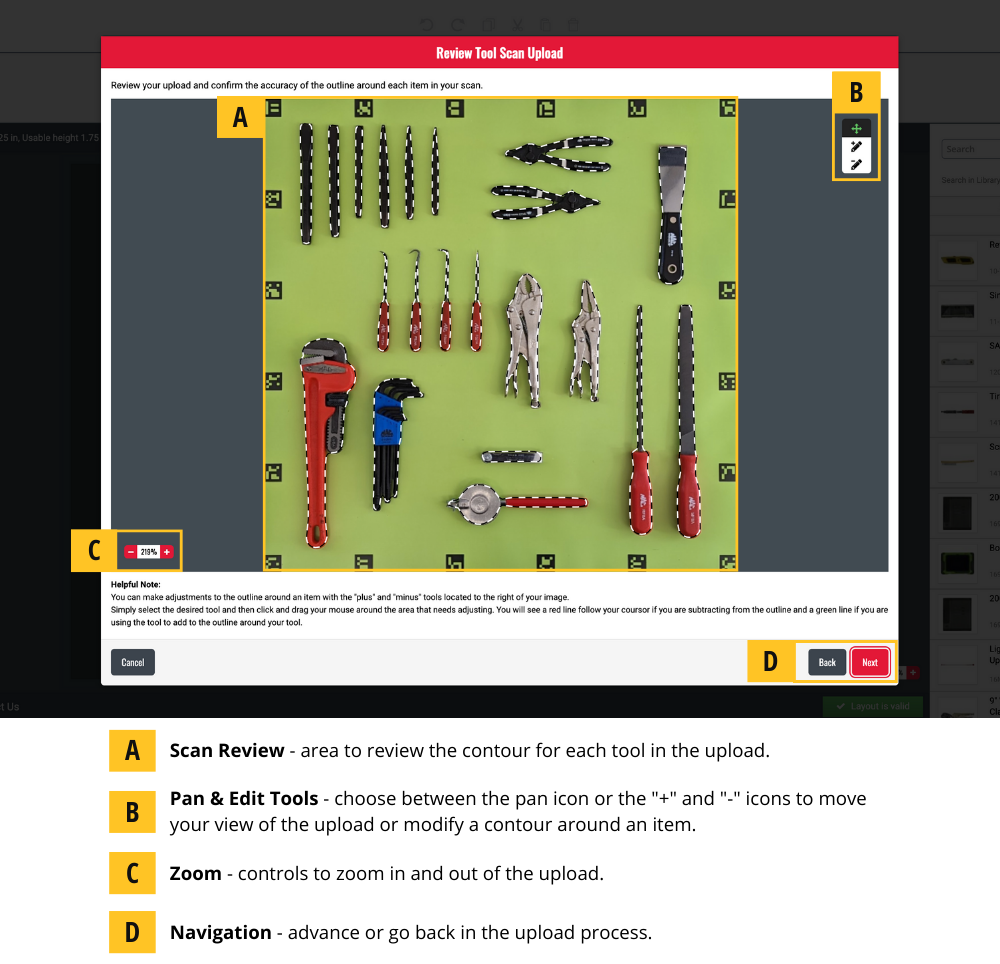
Review Your Tools
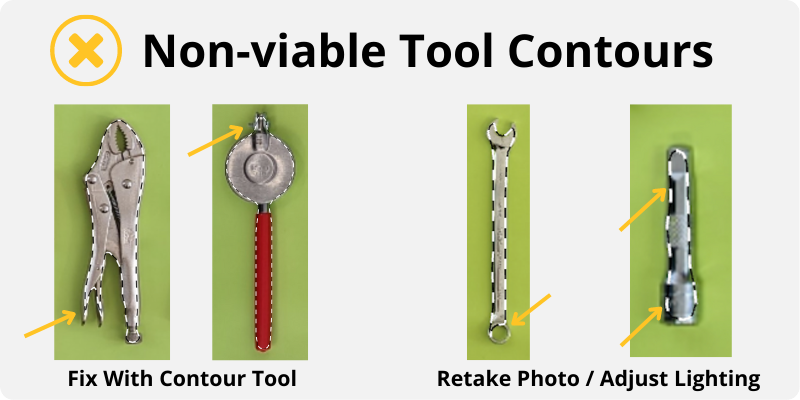
Review your upload to ensure the black and white dotted lines or “marching ants” capture the entire outline of each tool. The contours of the tools do not need to be perfect. The Foam Editor will add a small offset to each tool to ensure it fits nicely in the foam. Tools with small details may need to have the contour adjusted.
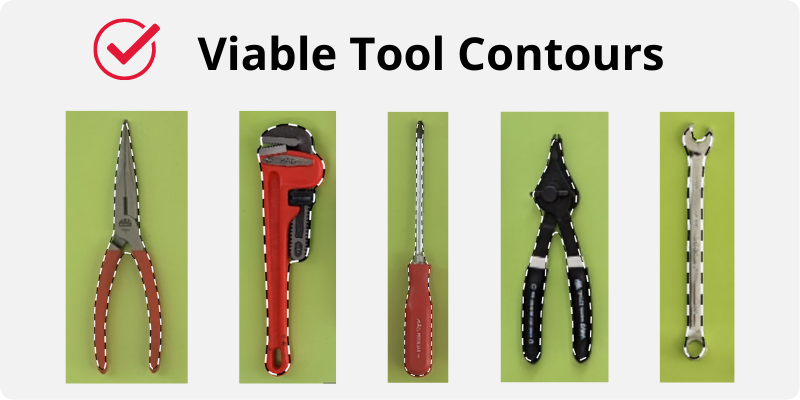
Examples of viable tool contours and contours that need adjusting:
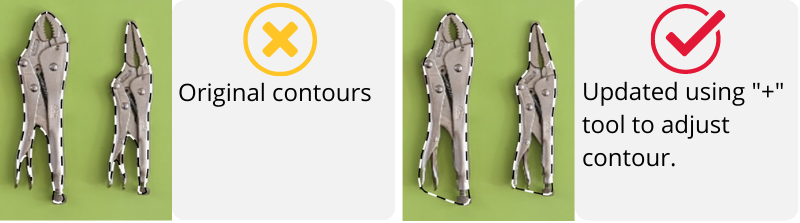
How To Adjust The Contour Of A Tool:
If the “marching ant” outline needs to be adjusted, use the “plus” and “minus” tools (B) to modify the contour. The contour edit tool works best by addressing a small segment of a given tool at a time. The “plus” feature can add portions of the tool not properly captured. The “minus” can remove any extra border created by a slight shadow or improper lighting.
[Add Gif showing how to use the contour edit tool]
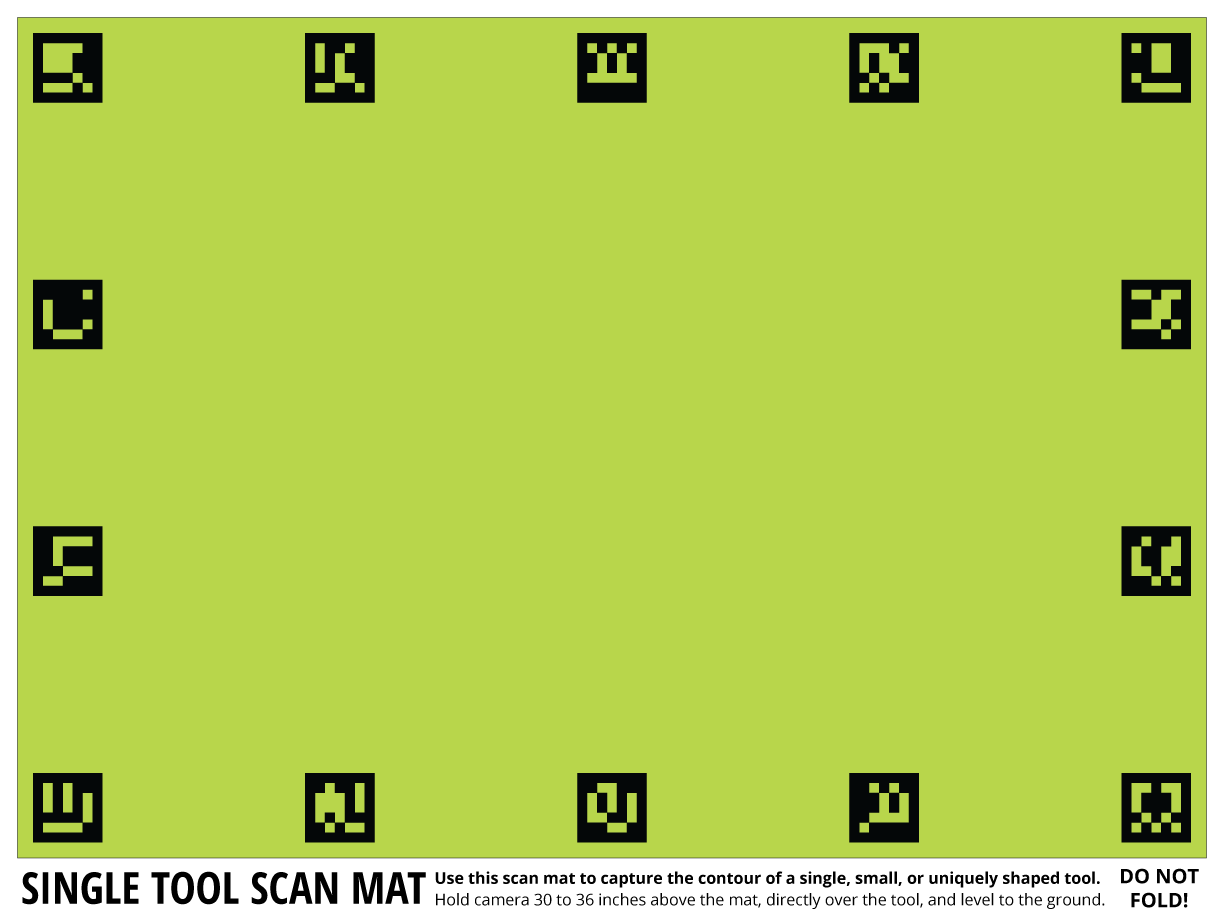 Single Tool Scan Mat If you cannot accurately capture the contour of a small or complex tool, use the single tool mat. |
UPLOAD OPTIONS AND SETTINGS
Once you have completed uploading your tool photo and are happy with the contours, the Foam Editor will need a few pieces of information.
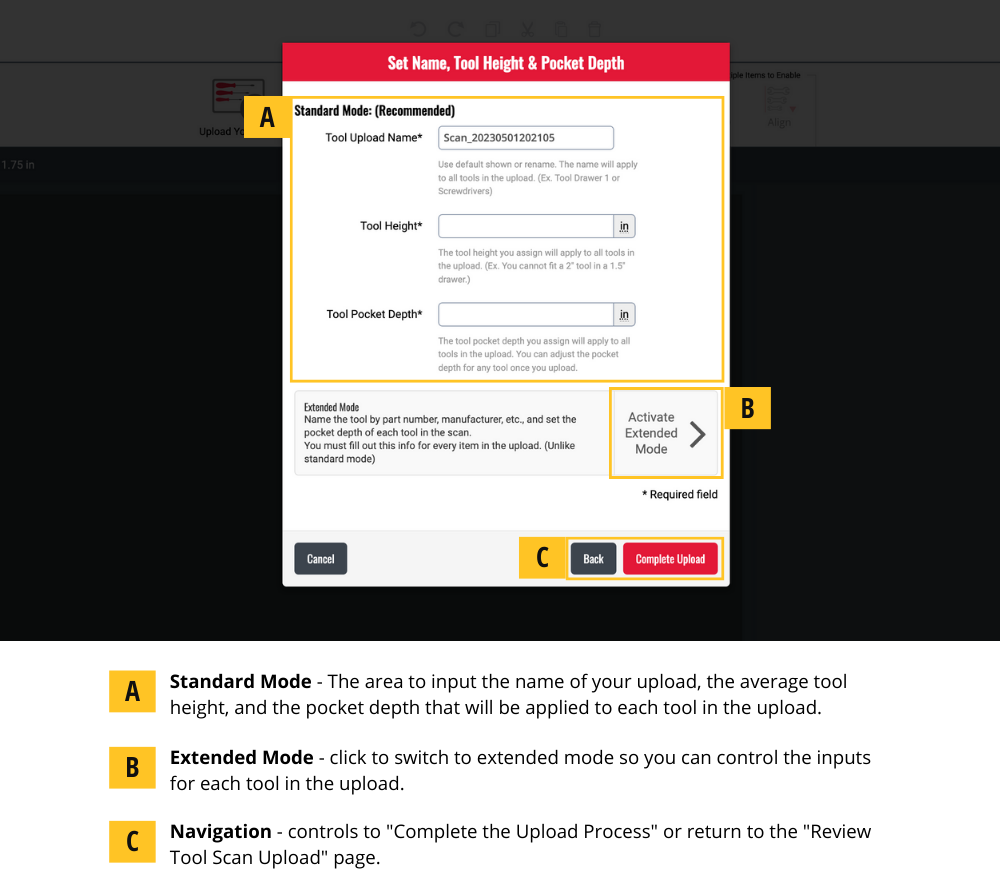
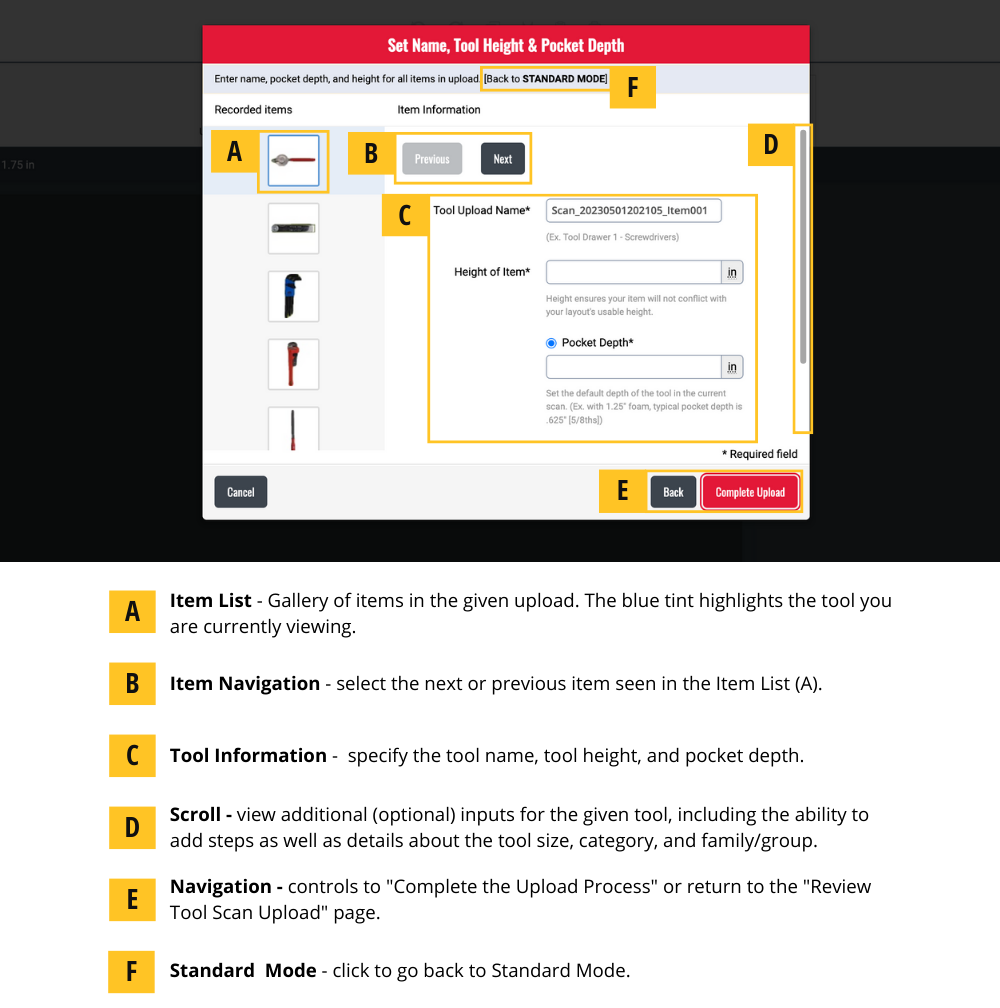
Standard Mode - Set Name, Tool Height, and Pocket Depth
- Tool Upload Name – This is the name that each tool in the upload will be assigned in your personal tool library. A default name will automatically populate but you can customize. For example, you can name the upload Screwdrivers if you were only uploading screwdrivers or Cabinet 1 Top Left Drawer if you are uploading a variety of tools for a given foam insert.
- Tool Height – Measure the height of your tallest tool in the upload and set ad the tool height. The foam editor uses this to ensure the tool will not conflict with the usable height within the space where the foam insert will be placed.
- Pocket Depth – This is how deep each tool will sit in the foam. Common tool pocket depths range between ½ to ¾ inch. The pocket depth for each tool can be adjusted later in the Foam Editor using the Step Edit feature for a given tool. <<Learn how here - Link to resource>>.
Extended Mode
Extended Mode allows you to specify the tool name, height, and pocket depth for each tool in the upload. This enables you to create a more detailed tool library on the MacFoamShop for future foam insert layouts.
Important Note: In Extended Mode you must complete the name, tool height and pocket depth for each tool in the upload.
DIFFERENT TOOL UPLOAD STRATEGIES
You can upload our tools in several different strategies. Additionally, you can combine different strategies for a single project to best suite your needs.
- Group by project or drawer layout (Most Common)
Benefit - you can name the upload by the project or drawer name, so you can easily search and find all the tools you want in that given layout by searching the name you specified in our personal tool library. - Group tools by tool type
Benefit - this makes searching and finding the desired tools in your library easy in the future. - Group tools by tool height
Benefit - when you group tools of similar height, you can achieve a consistent look with how your tools will sit in the foam.
Have questions? Give us a call or send us an e-mail; we’re here to provide you with the information you need so you can create the tool foam the best solution.